Thursday, August 31, 2017

What's in your baby bag?


               A while ago a friend suggested I write a blog post about what I carry around in my baby bag, so I finally got around to doing so! While there are so many options of baby bags to choose from, it all really comes down to personal preference and practicality. With my first baby, I chose a pretty simple baby bag that I bought from Target, and it matched my stroller. What I loved about it was how spacious it was inside and the compartments were placed in convenient places. With my second, I knew I needed something even more spacious, so after some research I purchased this Graco backpack: (link). I really loved the idea of having a hands-free bag, and it has two large sections (one for each kid). The backpack was also something my husband wasn’t embarrassed carrying around.

                However, this post isn’t to talk about the actual bag, it’s what’s inside that matters! Like a lot of first time moms, I used to over pack every time I would leave the house. It’s like that LUVS commercial, when every mom becomes an expert by their second kid (I hope). But, after a while, the weight of my baby bag became too heavy, as it was no easy task to hold a carrier with baby and a weighty baby bag.

So for you new moms who are possibly looking for what you should pack in your baby bag, here are some of my baby bag essentials aside from the obvious milk, diapers and wipes:

1. An extra change of clothes and socks- you just never know when you’re going to need these. I still always have an extra change of clothes for my daughter in the trunk of my car in case I need it. When my daughter was less than a year accidents included but were not limited to: explosive diaper accidents, spit ups, and feeding accidents that would stain her pajamas. SO, it’s always good to have an extra change of clothes.

2. Hand sanitizer and/or sanitizing wipes- As part of a large gift basket I received, in it was this organic hand sanitizer that is alcohol free. Because the bottle was so big, I bought a spray travel size bottle from the dollar section at Target and just refilled it when necessary. I took it everywhere with me when my baby was able to sit up on her own and crawl. It came in handy at restaurants, after play dates, shopping, long car rides, etc. I also pack a bunch of Clorox wipes in a ziplock bag, just in case I need to wipe down the stroller, car seat or any other surface that I feel may need to be cleaned.

3. A roll of small garbage bags- I have seen these sold at a lot of baby stores. I bought mine from Family Dollar for $1 per two rolls, and they’re scented! These are useful when you need to change a diaper at someone’s house or out shopping. It’s just good to consider avoiding stinking up someone’s garbage with a soiled diaper.

4. Pain Medicine- When my daughter was teething, she would often get irritable and when I could tell if she was in pain, it always helped me to carry around children’s Tylenol or Motrin.

5. Teethers/light, wipeable toys- If you want to keep your child distracted while you’re out, I find it beneficial to take toys that can easily be sanitized in case they fall on the floor or other kids get their hands (and mouths) on them.

6. Pacifier holder- So this may be a given to many of us moms is to carry around a pacifier in our baby bag. But, I bought this pacifier holder specifically for my pacifier and it just helped me keep it from going missing when I needed it most. My daughter only takes the pacifier when she sleeps, so it helped when I needed her to nap while I was out.

7. Snacks/fruit: Sometimes it’s always good to keep your baby distracted and calm, especially when you’re doing things that demand your attention like… grocery shopping. Sometimes a small bag of grapes, cheerios, or apples may do the trick. But, of course, be cautious of choking hazards!

8. Bandages: These are important to have especially when your child starts walking. Trips and falls are going to happen, and those knees and elbows may get scraped so it’s best to be prepared and have some bandages on hand.

9. Nursing cover for those who nurse: I always pack a nursing cover with me so that I am able to nurse my comfortably anywhere.

Summer essentials:
1. Diaper rash cream- You can also categorize this under the essentials (year round), but I found that I needed it most during the summer time and when it was hot out. The heat often brings on rashes, so it’s important to stay prepared so your baby’s soft skin isn’t irritated.

2. Insect repellent- To be completely honest, I don’t know if this was the reason my daughter didn’t get mosquito bites, but I would carry this organic insect repellent around with me during hot summer nights.

3. Sunscreen- I always had sunscreen in my baby bag. Especially if I knew I was going to be outside all day, or even before going out for a walk. I felt the need to always do whatever I could to protect her skin from the sun.


Each child may have their own needs that must be added to my list, but these are things that you would likely find in my baby bag. If there is anything that you feel is a must have in a mom’s baby bag feel free to add on to the conversation and comment below! Your feedback is always welcomed J

Saturday, May 13, 2017

Product I love: The NoseFrida Snot Sucker

Calling all moms and moms to be: stop whatever you’re doing and go purchase the NoseFrida snot sucker! Add this to the product I love list, actually no, product I’m obsessed with list. Actually, add this to the product I wish I invented and would love to meet the inventor because it’s that amazing list.


How did I not know about this product? My son recently got sick, and it’s so heartbreaking hearing his little nose congested. I have been trying to find him relief by using a humidifier, locking myself in the bathroom hoping the steam from the hot shower helps loosen the mucus in his system, and holding him upright for as long as possible. But, the absolute worst thing for me to do was attempt to suction out his boogers (I hate the word ‘snot’, so let’s just say boogers). A friend of mine, whose daughter had acid reflux early on as an infant, recommended the NoseFrida as a means to clear up the  congestion so that baby can breathe again. Desperate to find something to help my little guy, I immediately headed over to Amazon and found that it was at a reasonable price.

How it works is kind of strange, and may sound disgusting, but I assure you it’s not. It’s simply a tube with two ends: one for sucking out the boogers, and the other that is placed at the tip of your baby’s nostril. Don’t worry, you will not taste any boogers. You simply just suck them out and they stay in a tube with a filter. This thing has worked wonders for me, and has helped clear up my son’s nose so much so that he has slept much better with his cold since I bought it 

As any mom knows, it’s so hard when your baby gets sick as an infant because we’re extremely limited on what we can give them. And, I was told that this cold/cough can last up to two weeks. If I had to use that god forsaken blue bulb given to me at the hospital to suction out my son’s nose one more time I may have a nervous breakdown. My son hated it! And I hated doing it to him.
For all those who don’t know about this product here’s the link:NoseFrida


You’re welcome.

Thursday, February 9, 2017

The pains of hijabi shopping

                There was a time –maybe about 20 years ago—when appropriate hijab fashion was much harder to find. Now-a-days, hijab fashion is easily accessible to us through the internet and various boutiques, especially in and around the city of Dearborn. But, make no mistake about it; while we (hijabis) are lucky enough to have these options available, the struggle is still real at some of our favorite world popular retail clothing stores. The H&M’s, the Zara’s, the Banana Republics, all of which are my favorites, but it’s not easy finding a blouse that doesn’t require some sort layering.

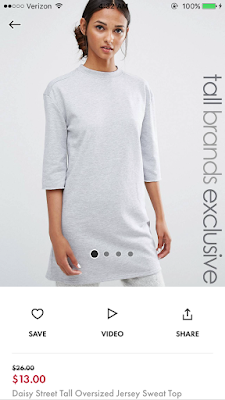
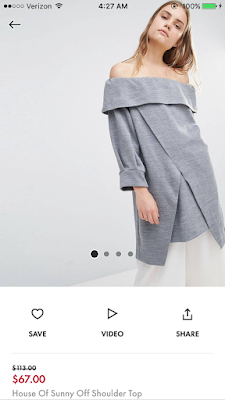
 Yesterday night I couldn’t sleep —mainly because my stomach is getting bigger and it’s much harder to get comfortable. So I laid in bed and started randomly surfing through the ASOS store app on my phone. ASOS has become another one of my favorite online shops, and it has such a wide variety of clothes. As I directed towards the 70 percent off sale link, I found a number of clothing items that just made me want to cry. Why? Because they could have been, should have been, and would have been so great if they aligned with my Islamic dress code. So, I decided to take some screenshots and share with you what it’s really like to be shopping as a hijabi and some of the agony that one endures during the task.

The dreaded split:

You find a dress, and it’s got the most perfect, subtle print.


Ahh, yes…you’re already imagining to what event you will be wearing this lovely number to. 


Then you scroll to the final angle image. Here you experience the jab to your rib cage. Sorry, not sorry ASOS says. You may have found the perfect dress, except for it has a slit that, even if sewed closed, might be too tight around the legs to walk in. You’re saddened.


Don’t Turn Around: 

OR…you find this perfect dress for an occasion (i.e- a family wedding, an engagement party).  You think it’s complete as it is long sleeve, floor length, and the color isn’t so obnoxious.


Then, the model turns around, and you realize the open back that is as wide as when Moses split the sea. You start to wonder how you can make it work. You realize you can’t, you accept defeat and move on to the next.


The “I-will-probably-never-find –the-perfect-color-to-go-underneath-this-so-that-it-is-all-lined” long sleeved lace dress:

Speaks for itself.


There are many things in life we hoped were longer--like vacations, the money in our bank accounts, Obama's presidency, and for hijabis: dresses, skirts, pants and sleeves: 

I cannot tell you how many times I’ve come across dresses like this. Perfect colors, long sleeve, and then it just abruptly stops me mid-mind sentence as I notice it’s tea-length. WHYYYYYY?? And, I’m sure I’m not the only one who looks at the price and wonders if it’s reasonable enough to buy two of the same, and have a seamstress make it longer before realizing it’s not worth it and reluctantly moving on.


Culottes (about knee length or longer trousers) are super in right now. But, they also give me some anxiety because like this pair… it would have made me so much happier if they were longer.


No silver lining here... 

While there are several ways to make these items work as a hijabi, for example, wearing a matching slip underneath, or having a seamstress sew a new lining for you; truth be told it’s just an added inconvenience. You find a pretty skirt or dress and realize you can see through it like looking through the windows to your now crushed soul. It’s half-lined, and you sigh and start to argue with yourself “could I find this exact fabric at the fabric store? Is the print of the skirt really worth it? Can I not find anything like it?”


The ¾ sleeve: 

This one is one I particularly hate. For example, look at this perfectly long lined tunic. It’s not too fitted and perfectly appropriate for modest dress. Except you look at the sleeves and you instantly hate the maker of this piece for not making them longer. Would it look nice with a long-sleeve shirt under? Likely No. Move on.


Look at this lace top that would match up elegantly with a long flowing skirt, or wide leg pants. But, noooooo … to make this work, we would have to wear a longer sleeve underneath and ruin the entire illusion of the lace. My head hurts.


Can’t I just find a long white blouse that doesn’t require me to wear a long sleeve shirt underneath so that it’s not see-through?

Nope.


And, lastly, this annoying number:

I’ll let you figure out what’s wrong with it.


Tell me some of your experiences when shopping at retail stores that aren’t particularly aimed at the hijabi dress code. I look forward to reading your feedback. 

Friday, November 4, 2016

My favorite gender reveal party ideas!

Hi friends!! It’s been a while since I wrote my last blog. I am taking online classes, and with an exploring one-year old and housework, my down time is rare. However, I had to make time to write this post because it’s about one of my favorite things! For those of you who don’t know, I am expecting baby number two in April 2017. I’m super excited (and nervous) for my daughter to gain a sibling and for my expanding family. Today, Nov. 4, was my anatomy scan, and tonight I will find out the gender of my baby. I have planned an intimate gender reveal party for our immediate families and the anticipation is killing me! Nobody will know the gender until the party—including me and my husband.

I absolutely love gender reveal parties. I find it so exciting to watch a couple realize whether they are expecting a boy or a girl. The suspense gets me every time—even if it’s a party for a couple I don’t know. My heart races just before the big reveal and I look forward to assuming bragging rights if I correctly guessed the gender. I have spent endless hours watching clips from the Instagram account @genderrevealvideos and enjoying the reactions of parents when they discover the pink or blue. So, I decided to write a blog post about my favorite gender reveal ideas in hopes that you might like them and use them for your own parties.

Some of my favorite ways to reveal a baby’s gender can get pretty messy and are probably best to be performed outdoors. So here are some cool ideas to do outside:

Silly string:

 If the weather wasn’t so cold, I think this would be the route I would have went to reveal the gender of baby no. 2. Basically you would have to plan ahead for this one, and confide in someone you really trust if you don’t want to know yourself. If you had your ultrasound scan done ahead of time, you can give the results to a friend or family member and have them go out and buy a bunch of silly string cans in the color that will easily indicate your baby’s gender (usually this is pink or blue). Have your “confidant” cover up all of the cans with some sort of wrapping paper that hides what color the silly string is and make sure you have enough for all of your guests. When you are ready for the big reveal, you and your significant other can stand next to each other and on the count of three:

Photo retrieved from: pinterest

Baseball/football/hockey/golf:

For all you sporting fans out there, this is a pretty creative idea to allow others to find out the gender of your baby. For this idea, again, you would have to trust in a confidant to purchase the correct color exploding ball.  Or, you can buy both colors and just give the results to your person and have him or her select the corresponding color. Here’s some that you can find on Etsy: exploding baseball. The way these work is one of you could pitch the ball and the other would bat, one of you would kick a football, slap the hockey puck or swing and hit the golf ball, depending on whatever sport you choose. If all works out well, the ball will explode in a bright pink or blue, letting everyone know whether it’s a boy or a girl!


Photo retrieved from: Pinterest

Smoke bombs:

My cousin did this for her gender reveal party, and I thought it was so cool. She is expecting twins, and so she had ordered a set of four smoke bombs online –two pink and two blue. Her sister went with her to her 20 week ultrasound and was given the gender results in private. When it was party time and all the guests had arrived, someone lit the first smoke bomb for ‘baby A’ and shortly after the second for ‘baby B’. Here’s a link to purchase these smoke bombs: Colored smoke


If the time you discover your baby’s gender falls in the colder months and you would prefer something that wasn’t so messy for an indoor party, here are some more of my cleaner suggestions:

Jack in the box:

So I saw this recently and thought it would be so fun. The only problem is it’s hard to find a gender reveal jack in the box, so some creativity is needed for this project. You can find a regular jack in the box online, but it would be up to you to figure out how to customize it in such a way that would reveal the gender of your baby. If you can find one big enough to put some small flowing balloons in there, that would also be ideal. But, the whole concept is having to wait until the jack pops out of the box using the musical lever to discover the blue or pink while everyone waits in anticipation. Here’s a Youtube link that I found that involved a jack in the box: Jack in the box gender reveal video

Cake surprise:

The cake surprise is a common one, but it is still fun and fail proof. When I had my first gender reveal, I tried to keep in mind something that was going to be easy to unveil. I initially wanted to open a large box of blue or pink balloons, but after seeing countless videos of balloons that didn’t fly out and couples who struggled opening the box, I opted out. Though I didn't do the cake surprise, I would recommend it. The cake is easy, clean and just as suspenseful as all the others ideas.

Photo retrieved from: Pinterest

Cupcakes (or any other dessert):

This is the gender reveal idea that I’m going to do for baby number 2. I have prepared an order of 20 cupcakes (one for each guest), and only of the cupcakes will be filled with the color of my baby’s gender. I will not know the gender, but I have a friend who will know the results and has offered to call in my order. The plan is to have our families bite into the cupcake at one time to discover who has the lucky cupcake! You can do this also with cake pops or anything that you can come up with creatively to surprise your guests.

Photo retrieved from: Pinterest

It’s also fun to get decorative with pink and blue balloons, flowers, and dessert spread. I also like to keep track of everyone’s guesses prior to the big reveal, so that I can have them for memory. What are some of your gender reveal idea favorites? Did you have a gender reveal party? If so, what did you do? Let me know in the comment section, and don’t forget to subscribe! :) 


Friday, August 26, 2016

Product I love: Dr. Brown's Bottles FTW!

                        For this product-I-love feature, I’d like to talk about the Dr. Brown’s bottles for babies. Prior to giving birth, I was told to use Dr. Brown’s bottles as recommended by other moms. After trying other bottles as well, I found that the Dr. Brown’s bottle was my favorite. Here’s why:


                        When my daughter was barely a month old; she was pretty gassy. She wasn’t exactly colicky, but gassy. And, what is great about these bottles is it eliminates a lot of extra air that may go through so the bottle so your baby is only sucking in milk. When your baby is sucking in too much air, he or she will seemingly be uncomfortable because it causes gassy stomach pains. Other bottles that I used, for example, the Medela bottles that you can pump breast milk right into, allowed way too much air and I was able to see the air bubbles as my daughter was drinking.

                        Another cool thing about the Dr. Brown’s bottles is that you are able to change the flow of the nipple as your baby grows. I'm sure other bottle brands do this too, but for Dr. Brown's there are three different levels: level 1 being the slowest flow, and level 3 being the fastest. Instead of changing the whole bottle, all you have to do is buy the new nipple, which you can find at places like Target for under $5. They also come in multiple different sizes, so however much your child’s milk intake is, you can buy the bottle according to how many ounces it holds.

                        However, here’s the downside: while the Dr. Brown’s bottles are good at eliminating air intake, they tend to be a lot of maintenance when cleaning. They have so many different parts to them, so you always have to take the entire bottle and break the pieces up and clean them one by one. I had to purchase small bottle cleaners in order to get in the little holes of the Dr. Brown bottle parts.  It can get pretty annoying, especially when your baby is eating every 2-3 hours the first few months of life. I had to exclusive breastfeed through the pump, so I was washing bottles all day, every day. Another downside about the Dr. Brown’s bottles, is it does take quite a while for the baby to finish it. I’m assuming due to the restriction of air bubbles, the flow is much slower…so those night time feedings can seem to drag on and on.


                        Did you use Dr. Brown’s bottles for your baby? How did you like it? If not, what types of bottles did you use, and what was your experience?

Friday, August 5, 2016

A quick, easy and delicious quinoa salad!

 Anyone who knows me knows that I love salad. There’s a running joke in my family where I’m known as “more of a salad girl”, because I once said that I would prefer a salad over an ice cream Sundae. And, I truly mean that—not because it’s a healthier choice, but truly because I really love salads. Macaroni salad, potato salad, Greek salad, ranch salad, fattoush, tabbouli—if it’s a salad, add it to my list of favorite things. My most recent salad favorite is a quinoa salad!


 Last year, during my student teaching internship (yes, everything happened during my internship), I was still nursing and had to pack a nutritious lunch every day. One day my sister stopped by and dropped off this Tupperware filled with what she called quinoa salad. I’m not that big on quinoa, I feel it has a bland taste. However, with added lemon, salt and olive oil; it became something I could work with. I began experimenting with this salad and added some veggies and extra seasoning, and now it is probably one of my favorite lunches! It’s super easy to make and if you make a larger amount at the start of your work week; it should last you a good three to four days. I thought I’d share this simple recipe with you, and I hope you find it as delicious as I do!

Ingredients:
1 C Quinoa
1 or 1 ½ small lemon (for freshly squeezed lemon juice)
2 tsp of Tuscan house Italian dressing
½ tsp of salt
½ tsp of sumac
1 tsp of zaatar
About (maybe even less) ¼ C of olive oil
1 tomato (chopped)
1 small red onion (chopped)
Some crumbled feta cheese
curled parsley (chopped)

Directions:
1. Cook the quinoa as directed (usually it’s 2 cups of water per 1 cup quinoa) and let cool in a large bowl.
2. Add feta, tomato, parsley, red onion to the cooked quinoa.
3. Add salt, sumac, zaatar.
4. Combine olive oil, lemon juice, and Italian dressing in a small bowl and mix well.
5. Pour dressing over the quinoa salad and mix well.

You can add more salt, olive oil or lemon as desired. This salad is colorful, healthy and can be served for a picnic, a park day, a pool party or lunch time at work!


Let me know what your thoughts in the comment section! Enjoy!

Saturday, July 30, 2016

Create your own character themed party!!

I don’t recall ever feeling sad and excited at the same time. I mean, I was sad/excited to move out of my parents house to be moving in with my best friend on our wedding day, but the feelings weren’t so heightened as I prepared to celebrate my daughter’s first birthday.

                As mentioned in previous posts … my daughter loves to watch the show Maya The Bee. So, I thought it would be fitting to have a Maya the Bee themed party for her first birthday. I decided to have a more intimate gathering with just my husband’s immediate family and mine. Like many Arab families, if I were to invite extended family members on both sides … I would’ve needed a much bigger venue than my backyard! But, I figured I’d save the big birthday celebration for when she's a little older. 

                Despite the small guest list, the party took up a lot of time to plan and prepare! Unlike a lot of popular kids’ shows like Mickey Mouse Club House or Family GuyMaya the Bee party supplies were IMPOSSIBLE to find. I discovered that Maya the Bee is actually popular in other countries outside the U.S. The supplies that I did find were both expensive and would have taken weeks to ship. Still, I didn’t want to give up on the theme so I decided to get crafty and create my own décor.

                It was easy to find the yellow, black and white colors for the simple party things like plates, napkins, balloons, streamers etc. However, I did not want to have only the three colors complete my theme. I began searching Maya the Bee characters on Google Images, and I then printed about seven of the characters in color. I initially thought it would be a good idea to simply poke a hole in the cut out images I had printed and let the characters hang from a string throughout my canopy. Then, I remembered a trick I learned during student teaching that would keep the hanging characters sturdy and not so flimsy looking.

Here’s what I did:

1. After saving the images from my Google search I printed each one in full page view.

2. I then edited the each of the images in paint and rotated them to flip horizontally like so:


3. I printed the rotated images so that I had two images of each character. 


4. I cut out around each image

5. I took a piece of poster board paper--or you can use a manila folder like the one pictured above-- (or anything sturdier than computer paper) and traced the outline of my printed, cutout image onto the poster board paper.


6. I cut along the trace on my poster board and glued the two images on each side so that when you turn it over you will see the same picture.


7. I bought some thin white ribbon and poked a hole through the top of the image with a hole puncher and allowed it to hang from the ceiling of my canopy like so:


This helped create my Maya the Bee theme because I was able to incorporate the characters from the show in a fun, creative way. I also created a special piece for my sweet table in which I used the same steps shown above, except for I added a little stand. For the stand I used a small piece of styrofoam that I found a Michael’s and cut a little slither to place the characters foot in and added some extra poster board paper that leaned against the “back” of the character for extra standing support.


For my sweet table, I tried to keep the colors black, yellow and white. A little pinterest search helped inspire my fruit kabobs that consisted of black grapes and pineapples. I also created little pudding parfaits that included layers of crushed nilla wafers, instant vanilla pudding, and cool whip. 


Another yummy treat I made were these delicious smores balls that were a total hit! I found the recipe here: Smore's balls Recipe


The guest tables were set up with plastic table covers that gave the illusion of a lace pattern from Party City. Party City also had these white containers for a $1 that I put white and yellow flowers in to use as center pieces.We also created a snapchat filter, but unfortunately the font was a bit too small and I should have chosen a more visible color. 


 Each guest also received a party favor, which was a mason jar filled with honey (get it?) and a tag that read “Can’t BEElieve she’s already 1”.


The jars and tags can be found here and here. My lovely bee-hive cake was made by @FarhatSweets1 and was filled with this delicious pistachio custard flavor:


Another thing that might be of interest to you is the banner I bought! I thought it would serve as a sweet memory from this website called BuildASign.com. It was affordable and the image I used was crystal clear! It is super user friendly and if you sign up via e-mail you will receive coupons up to 25 percent off. I bought a sign that was 3x5 and it was the perfect size.


I had so much fun planning and celebrating this party, and I wanted to share with you some of these ideas so that maybe you can use them as inspiration for your upcoming event. 

What was the theme you used to celebrate your kids' birthday parties? Let me know in the comment section, and don't forget to subscribe to my blog :). 


By the way- I was totally kidding about the Family Guy mention. Definitely not a kid’s show.