I don’t recall ever feeling sad and
excited at the same time. I mean, I was sad/excited to move out of my parents house
to be moving in with my best friend on our wedding day, but the feelings
weren’t so heightened as I prepared to celebrate my daughter’s first birthday.
As
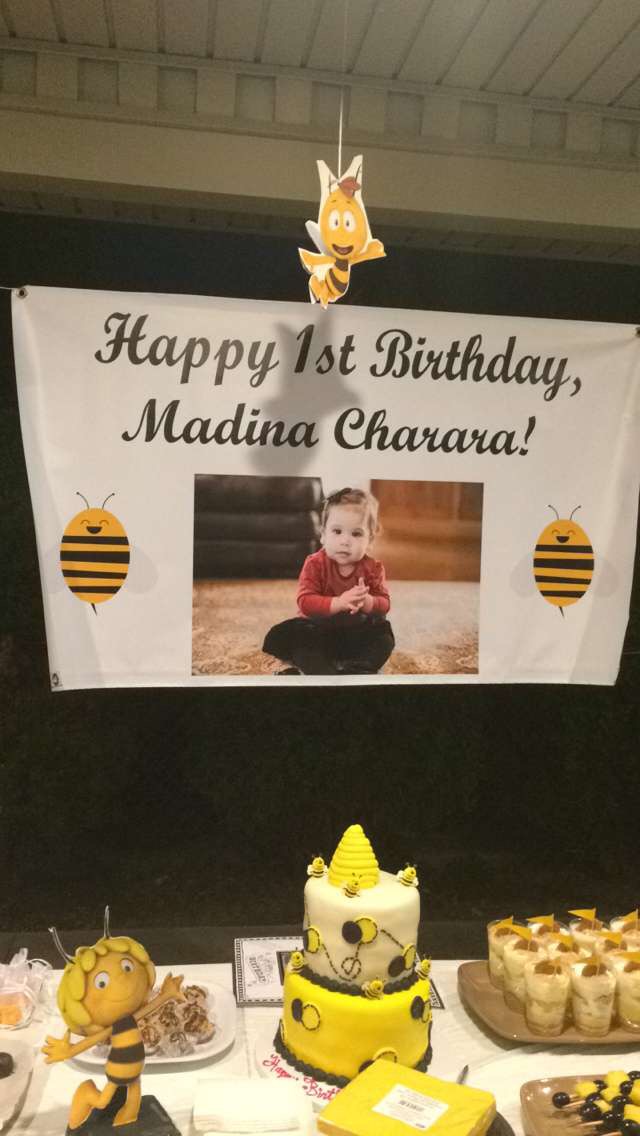
mentioned in previous posts … my daughter loves to watch the show Maya The Bee. So, I thought it would be
fitting to have a Maya the Bee themed
party for her first birthday. I decided to have a more intimate gathering with
just my husband’s immediate family and mine. Like many Arab families, if I were
to invite extended family members on both sides … I would’ve needed a much
bigger venue than my backyard! But, I figured I’d save the big birthday
celebration for when she's a little older.
Despite
the small guest list, the party took up a lot of time to plan and prepare!
Unlike a lot of popular kids’ shows like Mickey
Mouse Club House or Family Guy … Maya the Bee party supplies were
IMPOSSIBLE to find. I discovered that Maya the Bee is actually popular in other
countries outside the U.S. The supplies that I did find were both expensive and
would have taken weeks to ship. Still, I didn’t want to give up on the theme so
I decided to get crafty and create my own décor.
It was
easy to find the yellow, black and white colors for the simple party things
like plates, napkins, balloons, streamers etc. However, I did not want to have
only the three colors complete my theme. I began searching Maya the Bee characters on Google Images, and I then printed about
seven of the characters in color. I initially thought it would be a good idea
to simply poke a hole in the cut out images I had printed and let the
characters hang from a string throughout my canopy. Then, I remembered a trick
I learned during student teaching that would keep the hanging characters sturdy
and not so flimsy looking.
Here’s what I did:
1. After saving the images from my Google search I printed each one in full page view.
2. I then edited the each of the images in paint and rotated them to flip horizontally like so:


3. I printed the rotated images so that I had two images of each character.

4. I cut out around each image
5. I took a piece of poster board paper--or you can use a manila folder like the one pictured above-- (or anything sturdier than computer paper) and traced
the outline of my printed, cutout image onto the poster board paper.

6. I cut along the trace on my poster board and glued the
two images on each side so that when you turn it over you will see the same
picture.
7. I bought some thin white ribbon and poked a hole through
the top of the image with a hole puncher and allowed it to hang from the
ceiling of my canopy like so:


This helped create my Maya the Bee theme because I was able
to incorporate the characters from the show in a fun, creative way. I also
created a special piece for my sweet table in which I used the same steps shown
above, except for I added a little stand. For the stand I used a small piece of styrofoam that I found a Michael’s and cut a little slither to place the
characters foot in and added some extra poster board paper that leaned against
the “back” of the character for extra standing support.

For my sweet table, I tried to keep the colors black, yellow
and white. A little pinterest search helped inspire my fruit kabobs that
consisted of black grapes and pineapples. I also created little pudding
parfaits that included layers of crushed nilla wafers, instant vanilla pudding,
and cool whip.

Another yummy treat I made were these delicious smores balls
that were a total hit! I found the recipe here: Smore's balls Recipe
The guest tables were set up with plastic table covers that
gave the illusion of a lace pattern from Party City. Party City also had these
white containers for a $1 that I put white and yellow flowers in to use as
center pieces.We also created a snapchat filter, but unfortunately the font was a bit too small and I should have chosen a more visible color.

Each guest also received a party favor, which was a mason jar
filled with honey (get it?) and a tag that read “Can’t BEElieve she’s already 1”.

The jars and tags can be found here and here. My lovely
bee-hive cake was made by @FarhatSweets1 and was filled with this delicious
pistachio custard flavor:

Another thing that might be of interest to you is the banner
I bought! I thought it would serve as a sweet memory from this website called
BuildASign.com. It was affordable and the image I used was crystal clear! It is
super user friendly and if you sign up via e-mail you will receive coupons up to 25 percent off. I bought a sign that was 3x5 and it was the perfect size.
I had so much fun planning and celebrating this party, and I
wanted to share with you some of these ideas so that maybe you can use them as inspiration for your upcoming event.
What was the theme you used to celebrate your kids' birthday parties? Let me know in the comment section, and don't forget to subscribe to my blog :).
By the way- I was totally kidding about the Family Guy
mention. Definitely not a kid’s show.


